Installing Cemu
If you need further help, ask on the official Cemu Discord Server for assistance.
This section will take you through installing and configuring Cemu for the very first time. It is important you read all of the text here before proceeding to fully understand the instructions.
Introduction
Cemu can be installed by extracting a .zip file to some location on your PC, preferably avoiding locations that require elevated privileges. In this guide, we will use the Desktop.
Before launching it, we will slightly tweak the program to fix some scaling issues.
When we finally open the application, it will take us through the quick-start guide. This will help us to set up the emulator properly with the necessary files and folders.
Community Graphic Packs
Community graphic packs allow you to visually alter a game and how it will run, including:
- Displaying at higher resolutions
- Running at higher framerates
- Adjusting colours and bloom
- Improving anti-aliasing
- Applying game modifications
We recommend that you download these to allow tweaking your games for better performance.
Downloads
- The latest stable release of Cemu
- Linux users should use a Lutris script to run Cemu
- macOS users can download experimental Cemu builds from my site at cemu.emiyl.com/installation, before returning here
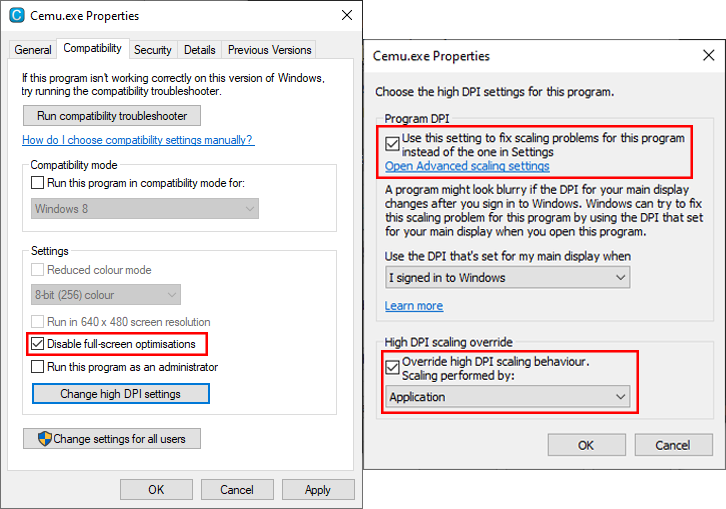
Preparations (Windows only)
- Extract the Cemu
.zipfile to your Desktop- Do not extract it to any folders that require admin permissions, such as Program Files
- Right click on the Cemu executable
- Click
Properties - Navigate to the
Compatibilitytab - Enable the option "Disable full-screen optimizations"
- Click on
Change high DPI settings - Enable "Use this setting to fix scaling problems for this program instead of the one in settings"
- Enable "Override high DPI scaling behaviour. Scaling performed by: Application"
- Click
Apply->OK
These options are set to help avoid issues on various Windows versions, and display resolutions. That said, one or more of these options will not be necessary for everyone, but not setting them may result in complications.
Configuration
- Double click the Cemu application
- You will now be greeted with the Cemu quickstart guide
- This will take you through setting up the emulator for first use
- Create a folder in a safe location named "mlc01"
- Leave the "Game path" field blank
- Click "Download community graphic packs"
- Click
Next

Finishing set-up
- For now, do not click
Configure input- We will do this next in more detail
- Enable "Automatically check for updates"
- If you do not wish to get update notifications, you may disable this option and update Cemu manually with an option under the Help menu
- Click
Close
Now that we have gone through the quickstart guide, we will move onto properly mapping controller inputs (including motion controls).